Features
- Low cost and low part count
- Four different flashing patterns, easily modifyable
- Speed control and pattern switching via pot
Introduction
This is nothing special, really. "Knight Rider lights" or "Larson Scanners" seem to be very popular microcontroller projects. I guess they are the next step right after the blinking LED (a.k.a. the "Hello World" program for microcontrollers).
I was recently asked if I could draw a schematic for such a device and in the end I decided to actually build the circuit. That way I could turn it into a blog post and make it available to a wider audience. The other point was that I could get my kids involved in building this.
This version is not exactly a beginner's project, because the charlieplexing is quite complex and turning the schematic into wiring can be a little confusing. So perhaps it is a good project to improve your soldering skills.
In this project 4 IO pins of an ATtiny13V are used. By employing charlieplexing, 12 LEDs can be controlled. The remaining available pin on the controller is configured as an input. Via ADC, the voltage output from a pot is read and used to control the speed of the pattern sequence. The "full speed" setting also serves as the pattern switching position. Four patterns are available. Changing them in the source code is simple, since they are coded as simple sequences of LED switch-on commands.
Components
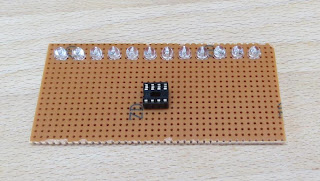
Basically there are the LEDs. I am using 12 red ultrabright LEDs, left-overs from another project.
Then there is the controller, an Atmel ATtiny13V. "V" stands for low voltage and means that the controller is happy to run from two alkaline cells (down to 1.8 Volts). A socket might be a good idea, especially if you want to reprogram it.
Finally there is the pot (missing in the photo above). Mine is of the 10k linear variety, but anything between 1k and 1M will be fine.
Perhaps I should mention the perf board as well, it is 50 x 100 mm. This is just wide enough to fit the 12 LEDs on.
The Schematic
In principle, it is very simple. Only the charlieplexing can be confusing. Just keep in mind that with charlieplexing the point is to have one LED between any two IO pins in either direction.
The pot just outputs a voltage between 0 Volts and the battery "+" voltage.
Since the controller pins limit LED current, no series resistors are needed. I measured an LED current of about 10 mA with my set-up and with batteries at 2.6 Volts (about 50% discharged). LEDs are usually rated at 20 mA, so we are on the safe side of things.
Building it
Start by inserting the LEDs in the board.
Take care to insert them so that the longer wire shows towards the edge of the PCB.
To avoid the LEDs falling out, bend the wires slightly outward.
Solder the LEDs to the perfboard and clip the wires. Mine isn't soldered perfectly, I know. It, wasn't me, honest. :-)
Next, add the IC socket. Somewhere in the middle is a good idea...
These groups are then connected to their respective controller port pins. The wires don't have to be green. :-)
Perhaps it would have been a better idea to put those wires on the bottom of the board. By putting them on top I created a kind of wire weave...
Now all cathodes are going to be connected. I started with the second port pin (PB1) - just to confuse you even more.
Next, I soldered the third port pin connections (PB2).
Keep going with the 4th port pin (PB3).
Finally, the first port pin is connected (PB0). Also, I added the power lines on the IC. Almost done!
There is one component left to connect: The pot. And voilà, the hardware is finished.
And if you want to see the thing in action, look here:


thanks for knowladge
ReplyDeletei wonder everithins about led..
so this is my email: alkuxander@yahoo.com
thanks..
do you have to use a computer or something to program it or is it like an ic timer circuit that controls it?? im trying to build a simple strobe controller. I dont want to spend hundreds on a set of emergancy strobe lights as i plow in the winder and i am out fitting my truck with led lights amber in color and need a strobe contorler and seeings how i am handy with a soldering gun i would like to try to build one with my 4 year old lil guy. id love to teach him how to do things like this. please any help would be great. please feel free to e-mail me @ jroberts.ashford13@outlook.com
ReplyDeletethanks in advance
Jeffrey Roberts
Jeffrey, essentially it uses a so called microcontroller, which is more or less a little computer. Also, the wiring is relatively complicated, so this isn't really an ideal beginner's project.
DeleteTry googling "ne555 4017", this will find you a suitable project.
Hi, yours seems to use the least parts from what I have researched online. Thank you for sharing.
ReplyDeleteI have built my project on a bread board but none of the LEDS light. Each PB# only measures 0.6 v and it seems the LEDs need about 1.5v to illuminate.
I'm stuck.
1 sec....... Looks like I have an attiny13a. I wonder if that makes the difference. The pinpoints are the same but perhaps the output voltages are different.
DeleteIs this the same microcontroller you used?
ReplyDeletehttp://www.mouser.com/ProductDetail/Atmel/ATtiny13V-10PU/?qs=sGAEpiMZZMvqv2n3s2xjsVIKSdqlAUq6ADzNlKUJ%2fFE%3d
also - can you link us to what kind of socket? You did a terrific job on this - I cant wait to start mine. Thanks~!
- Mike
Yes this is the right microcontroller.
DeleteFor the socket search for a "dip8 ic socket". That should do the trick.
Thanks!
DeleteSir can I run it on 9 volts, also how much current it requires.
DeleteUgh - Im still working on this project - I am having issues with the AATiny13v chip and controlling it from my arduino uno. What did you use to program yours?
ReplyDeleteHi! I'm a beginner programmer and this is awsome!!! What is the better to program this IC? Is there any kind of special interface? Thanks....
ReplyDeleteHi José. I am using a cheap chinese ISP programmer. You will find a description in another post in this blog. The keyword is ISP.
DeleteTo avoid problems I would recommend building a small extra PCB for programming, with just a IC socket and all necessary pins connected to the ISP header.
Thanks again!
DeleteHi Tom.
ReplyDeleteI would like to ask you, how I can make it remember last mode after switch on. Or it will begin to work from Larson Scanner mode.
Best Regards
santonets@email.cz
very nice to project to student
ReplyDeleteplease send details of that IC TINY 13V and also give equivalent of IC
ReplyDeleteI've built and tried this circuit - it works great! I reduced the l.e.d.s to 10 (as that was all I had of one colour) by taking the outside 2 out of the circuit, without any adverse effects on the functions. Also, my pot had a push momentary switch built in, so I used this to touch pin 3 of the ATtiny13 down to ground. This jumps the circuit to the next function, rather than having to adjust the pot to do it. Now I'm going to set the speed with a fixed value resistor and try to use the pot to control brightness rather than speed. Any ideas Tom?
ReplyDeleteBob, thanks for your feed-back. Nice idea to use the switch in the way you did!
DeleteChanging the brightness is of course possible. There are a few options. In hardware the first idea that comes to my mind is to manipulate the operating voltage of the circuit. It might be possible to use the pot for this. But this has limits, because the controller needs a minimum operating voltage. On the plus side, this could be done in hardware only.
Alternatively, you could use a different software - PWM is the magic word.
I actually have written a more complex software for this circuit. It uses higher frequencies to scan through the LEDs. At some point the human eye gets to slow to see any 'movement' or flickering. So you can create the impression that several (or all) LEDs are active simultaneously. You can then change their brightness by changing how long they are active during each cycle.
I used this scheme to create an 'afterglow' effect. But with a few modifications it would be possible to use the pot to change the general brightness of the circuit. I neglected this blog recently, but maybe I will find the time this weekend to publish something.
Tom, if you do end up revisiting this blog, would you please post the more complex software code you had written for this project? I would love to play with the afterglow effect.
Deletewhere dose one go to learn how to work with this stuff like the schismatics you made i don't know how to understand it
ReplyDeleteHi Tom I love this project! But I was wondering where the blue wires and the green wires and the pot and everything is all connected on the back? If you could answer back and maybe post pictures to show.. Thanks! Great work!
ReplyDeleteI mean like where is each wire and the pot connected on the back? I am trying to get info so I can build this. I love this project! I'm a big knight rider fan
DeleteWhat is the list of materials?
ReplyDeleteDid you look at section "Components"?
Deletei need a list
Delete12 red LEDs
Delete1 Controller ATTiny13A
1 potentiometer
Al listed in the section "Components"
hi tom
ReplyDeletemy name is tommy. i live in cape town south africa. i build the cuircet and im trying to program the attiny 13 chip using my arduino uno but when i try and load you code it seas that this file #include "tn13def.inc" cant be found. what souled i do???
i neeed the pcb layout
ReplyDeleteThe layout is under "Schematic" in this article.
DeleteI was hoping you could answer this without me building it first. If I use fixed resistors to set the scan type and speed will the circuit remember it after the power is removed and then re-powered?
ReplyDeleteHey Tom, my son and I are fairly failure with arduino and coding. We are currently using an UNO. We downloaded your code, Charlieplex Knightrider, and when we run it, its looking for TN13DEF.INC. I've gone out on the NET and downloaded this code and got it in my Library. This is where we get stuck. Any suggestions? Thanks.
ReplyDeleteJim & Jarod.
Tom are you still monitoring this blog?
ReplyDeleteThis comment has been removed by the author.
DeleteHi Tom, I figured out how to modify the ASM and compile a new hex. I just needed Mode0 and trimmed modes 1,2 & 3 from the code. I wanted to thank you for making this project available. I am helping a friend with a prop build and needed as few components as possible. This project definitely flipped the bill. Again, much thanks!
DeleteHi tom.can i use attiny85 because i cannot find attiny13v at shop my place. please email me zul2582@gmail.com
ReplyDeleteis this classic knight rider effect with PWM?
ReplyDeleteCharlie, can this be modified to have three Leds chase up and repeat? First led at 30%, second at 60% and third at 100% chasing from left to right and then repeat over and over?
ReplyDelete